Tips and Tricks for Creative Journaling
So you want to start a Creative Journal or Customized Day Planner but don't know where to start?.. Luckily, your timing is perfect! Journaling in an actual book, as opposed to a virtual notebook is making a comeback..so take a few minutes to read through these suggestions, grab a blank book and a pen and jump right in!
YOU WILL NEED:
*a great journal...dot grids are popular right now. I have some in my on line shop, but blank paper is fine too.
*get some nice pens..nice doesnt have to mean expensive..my faves are Microns and Staedtler Fineliners. Avoid markers that bleed through paper... Coloured pencils are good too
*gather a ruler, pencil, double sided tape and post it notes
* make a trip to your local craft, stationery, or dollar store and check out the stickers, labels, and washi tape especially made for journaling.
*do you love your handwriting? If yes, move on ahead, if no, go on over to my Handwritten Fonts page and get some tips on improving or changing your handwriting. There are also some fun and easy fonts to learn.
LETS GET STARTED!!
1. Decide on the theme of your journal/day planner. My example is going to based on my own which is a mix of work related information and general day to day stuff. You might be designing a journal for a trip? Or a place to record fave recipes, restaurants wine pairing and meal planning? Or maybe its a guest book at the cottage...whatever your theme, the principals are the same.
2. Plan the headings that you think you might need and make a list. My list looked like this...'Contact Info', 'Index', 'General Show Check List', 'What needs to be done for Xmas Shows 2016', 'Book Contacts', 'Special Orders', '4 Month Grid', 'September overall calendar', 'September Daily Calendar' (each daily calendar for the month will have a block of pages, 3 on a page, 6 to a spead ...and this can change to suit your needs if you have busier times in each month), 'October overall calendar', 'October daily calendar' and so on. I will have a 'Christmas Gift List' spread, a spread for my 'Passwords' and a block of pages for 'Finances'. There might be more, but you get the idea. Take a few days to think this through as you may want to add things...as long as you dont use every page you can add things later as well.
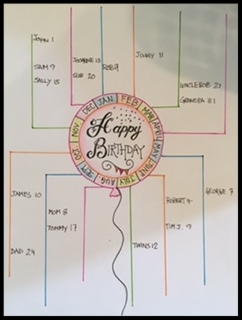
Some people make "Collection Pages" as well, 'Books I want to Read', 'Movies I want to See', as well as graphs and charts for things like 'Mood Trackers' or a tracker for a specific goal..like 'exercising daily' You can find lots of ideas for trackers on Social Media sites and I will post pics of some suggested layouts at the bottom of this page.
*NOTE* I am not sure how important the index is to me in general everyday use, but it serves it's purpose if you screw up as described in Step 3.
3. When fairly satisfied , transfer these headings to post it notes and start laying out your journal.
You might switch things around alot, and that is fine. You will have to guestimate how much room you need in each section, and you wont always guess right, but as long as you have blank pages left you can work it out.
*NOTE* This is where the Index will come in handy. Let's say you run out of pages on your Xmas Gift List spread, that runs from page 34 to 36, but you have something else blocked in on page 37. You can make a note on the bottom of page 36 to continue on Page 83 with your gift list and then enter that in your Index.
Start with your contact page in case your journal gets misplaced. Then the next spread will be your index if you choose to use one. Carry on assigning each page , or block of pages a heading.
4.When you are satisfied with your layout, you can number your pages and fill in your index. ( you are fairly committed to this now)
5. There are various 'systems' out there right now to help you keep yourself organized. Personally I use little squares for tasks (that I can fill in when they are completed or carry to the next day if they are not) I use an asterisk for things I want to remember, and a circle for an event. You could write, TASKS in black, EVENTS in blue and THING TO REMEMBER in red. You could draw a little light bulb if you have BRIGHT IDEA, or draw a heart for SOMETHING YOU LOVE. You can have a huge list of symbols and make a key for the symbols! It really does not matter as long as it makes sense to you .
NOW THE FUN REALLY STARTS!!!
At this point you will find yourself in one of the following categories:
*creative and enthusiastic...you dont care if your kids miss a meal as long as you can work on different layouts ...You can JUMP RIGHT IN!!!
*not creative, dont care, dont need to be. You are doing this for organizational purposes only and dont care what it looks like..you too, can JUMP RIGHT IN!!
*somewhat creative and enthusiastic, but you are worried about starting off strong but then losing interest and having your journal look good at the beginning, but sloppy and unkempt at the end.
If you belong to this group, have a look at the following tips.
6. Check out the Handwritten Fonts page mentioned above.
7. For inspiration google image, pinterest, instagram, or whatever the following keywords and hashtags ...Bullet journal, journal headers, journal flags, journal fonts, journal banners, journal layouts, journal bullets and keys, journal collections , trackers etc. This will be a great start. Save any images that inspire you.
8. Give yourself lots of time, dont try to start a journal on Sept 30 that you want to begin on Oct. 1.Give yourself time to prepare...so there is no pressure.
9. You do NOT need to start on page one....jump to the back of the book and get your feet wet. As your confidence builds, move up to the front, then back to the middle.
10. Prepare layouts well in advance....spend a lazy rainy Sunday afternoon just working on headers and layouts... If you reach the end of the month and you have a busy day ahead, you are probably not going to take the time to make a pretty page. And....dont worry if every page is not *pretty* ...function is first, pretty is second . Have some simple back up layouts reserved for busy times.... your easiest to do handwriting and a simple divider line.
11. DONT WORRY ABOUT MAKING MISTAKES!!! We all do it ALL the time! Either .... incorporate it into your page creatively, or cover it up with something! (Stickers, more paper, labels, anything goes here) *avoid the urge to tear it out as you have the pages numbered
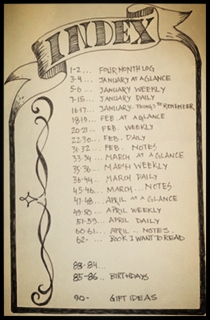
Ok i think you are ready. Here are some pics to inspire you.
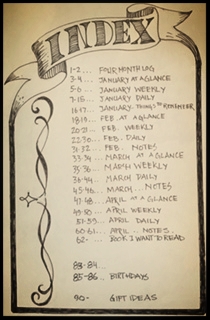
- You don't have to use an Index. Some people just use tabs.
- You can find lots of fancy hand drawn fonts on line.
- You can also google banners, borders and chalkboard art for inspiration.
- After i finish laying out the calendar, I will add 'collection' pages randomly at the back so that if a section needs more room, it is available.
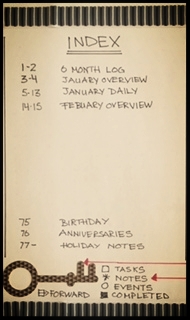
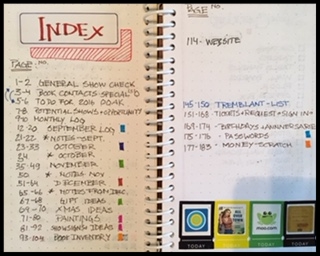
- Here is an example of a much simpler Index, nothing is hand drawn.
- The border is ribbon from the $ store. Washi tape also works well for borders.
- The 'key' is a sticker. Some people like to use bullets to indicate different activities, some use icons and some use colours. The key helps you remember.
- All this page needs is pen and a ruler.
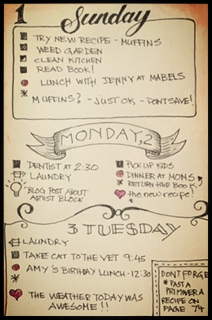
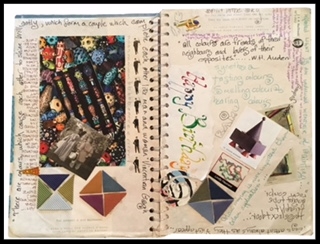
- A daily spread with a little flair for people who like to be creative.
- Coloured pencils come in handy.
- My favourite pens are Microns and Staedtler.
- You can also use a combination of hand drawn elements and stickers or embellishments.
- If you were involved in scrapbooking you will have lots of stuff already on hand.
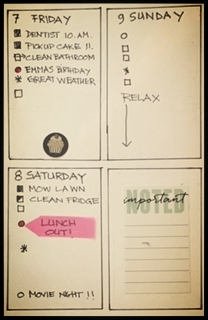
- And now a much simpler daily layout using only a few pens, a ruler, some stickers and post its.
- If you have enough room, this layout works well because you can see the full week on one spread and have a space left for random thoughts or notes.